Printer troubleshooting problem and solution
Printer troubleshooting
( problem and solution )
Index
1)10 COMMON PRINTER PROBLEMS & THEIR SOLUTIONS
2) Common Toner Cartridge (problems and solution)
A)Common OPC Drum faults faults
B)Wiper blade faults
C)Magnetic Roller faults
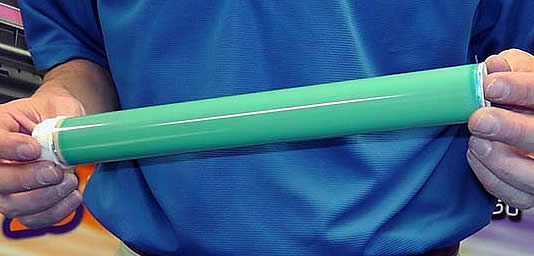
The most common toner cartridge failure is usually due to issues with the drum unit. The drum has a wiper blade which scrapes any excess toner off the surface as well as off the paper and Transfer Belt.
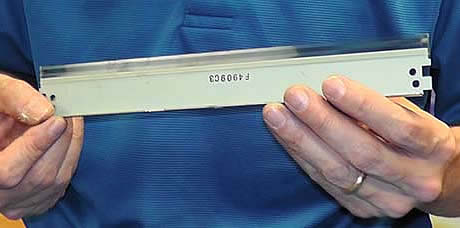
The next most common toner cartridge issue to occur would be due to an problem with the Wiper Blade. After the image is transferred from the Drum to the paper or Drum to the transfer Belt there will be residual waste toner on the Drums surface which needs to be cleaned before the next revolution of the Drum. The Wiper Blades job is to collect, clean and scrape any residual waste toner from the Drums surface, depositing it into the waste toner hopper

The PCR is a roller which controls the charge being applied to the Drum Cylinder. Basically it places an initial uniform charge on the drum then towards the end of the cycle erases the residual charge once more applying a uniform charge. This leads into the next print cycle(each revolution of the drum is considered a ‘cycle’). Because of this dual role, there are some severe failures which can come from the PCR. Most of these failures will show up more in winter where the humidity is low rather than in summer when it is high (this is due to Static build up).
( problem and solution )
Index
1)10 COMMON PRINTER PROBLEMS & THEIR SOLUTIONS
2) Common Toner Cartridge (problems and solution)
A)Common OPC Drum faults faults
B)Wiper blade faults
C)Magnetic Roller faults
D) PCR (Primary Charge Roller)
E)Common Developer Roller Problems
F) The Doctor Blade
G) Magnetic Roller Bushings
3) printer (software problem and solution )
1)10 COMMON PRINTER PROBLEMS & THEIR SOLUTIONS3) printer (software problem and solution )
* Toner Lines- If your finished print page has lines added to it, it may be acting up for a variety of reasons. It can be as simple as random substances accumulating on the scanner glass, to drum malfunction or fuser issue. Most of the time, all the printer requires is a little TLC. Using a rag to clean the scanner glass takes seconds and barely costs anything. Usually cleaning the glass will remove the added lines. And try also another way because one problem have many solution or one problem is caused by many problems
* Replace the ink cartridge- Don’t freak out, you will get your print job completed. Most recent printers have some sort of ink tank level indicator and will issue warnings when it starts to get low. Depending on the machine, you will get prematurely low ink warnings before the ink level is critically low. The best way to determine your ink level warning is to continue printing beyond the warning message and seeing how long it takes until the output quality starts to degrade. That way, you will have a better idea of how long your printer can last before changing the cartridges. It is better to just go ahead and order the new cartridges as soon as the message appears to have them ready; but no need to install them until the printer stops printing altogether, or the color drastically fades.
* Wrinkling Pages- There is nothing professional about copy pages that come out of the machine crinkled looking like they have been pulled out of the bottom of a backpack. Moisture from humidity, worn out feed rollers, worn out paper trays and fuser assemblies all cause wrinkled pages. A good way to check and see if this is a problem you can fix requires you to take out the paper tray and make sure the paper is loaded in there correctly. If the problem is the feed rollers or fuser assembly, you’ll need to call your trustee printer repair technician.
* Paper jams- Paper jams are way less common than they were a decade ago, yet they still happen. By far the most common cause of paper jams is paper misalignment, causing small shreds of paper to get stuck somewhere in the paper feed mechanism. Be sure to square off the stack of paper before inserting it into the tray, be sure the guides are even with the paper and avoid over-filling the tray. Just like a ceiling fan collects dust, printers do as well. Dust collecting also clogs machines and can lead to paper jams. Just a simple cleanup of removing dust off of printer rollers and feed trays can resolve the problem. Use a lint-free microfiber cloth or alcohol-based cleaner to clean print rollers. Try to keep your printer clean, dry and dust-free from the inside.
* Blank Sheets Ejected- In a busy office where a printer is shared, MFP printers have a feature which deliberately uses a blank sheet to separate one print job from another. Most machines go through the printing preferences, where you can enable or disable separator pages. Once that setting is set in place, blank pages will automatically be removed from the printer preferences.
* Copies are too light or too dark- Majority of the time, issues with light and dark on pages is the result of an imbalance in the density controls on the copier. Someone may have inadvertently altered the settings, making images copied too light or too dark. The best solution in this case, is resetting the density levels. It is also possible however that the drum could be reaching the end of its life or that the toner in the machine is bad. If this is the case, replacements should be purchased and installed.
* Web page won’t print properly- It can be quite frustrating when you see one thing on the screen expecting it to look a certain way, and then it comes out looking completely different. The problem with web pages is that they can be any size because they aren’t limited by the width or height of the paper in your printer. This is an easy fix with many solutions. Always review the document before printing it in print preview mode to see how what exactly you are going to be getting. Only print the pages you need, so you don’t get all the additional comments and adverts. If the web page is wide, it is best to print in landscape mode so nothing gets cut off. Some web pages have a print button within the web page that takes out all the excess stuff such as ads, printing only the content you need versus using the browser print button which will include everything. Last but not least is the ‘shrink-to-fit’ option that helps when pages are just a tad too big to fit on the page.
* Printer is too slow- Some printers are faster and some printers are slower but you may be able to get even a slow printer to speed up a bit. Using a wireless connection that has a lot of traffic can make your printer slow down all print jobs, since it has to transfer all the information. However if you do print wirelessly, make sure your router is adequate- it should support 802.11n-and that its firmware is up to date. A wired connection is by nature faster, so whenever possible use either a wired network connection or a direct connection to your computer. Printing in draft quality versus high quality, will save you loads of time and will also reduce the amount of ink being used.
* Printed Text looks lousy- As you now know, printers vary widely in text quality. Inkjets generally offer text suitable for home, school and casual business use, while most lasers are capable of printing crisp text for more professional-looking documents. Whether inkjet or laser, make sure your print settings are correct by switching from draft-mode to high quality mode. With laser printers, it may mean that the toner has settled. Remove the cartridges and shake them gently side to side. Often times a cartridge will respond to this, though sooner or later you will need to replace the cartridges. Also try cleaning the nozzles and make sure the print head is aligned correctly.
* Seeing Spots- The printer isn’t playing tricks on your eyes. As the name suggests, this problem consists of random arrays of dots marring an otherwise perfect document. If you notice the dots in the same place every time, it is likely an issue of dust or wastage chamber of toner and copy mirror or glass. Refer to ‘toner lines’ above to see how to clean properly. A more random array of spots repeated throughout the document could mean there is defect in the drum. Replacing the drums should fix the issue.
* Best Solutions:
In addition to the solutions mentioned above, there are a few steps that you can take in your office to make sure your common machine problems are reduced. First and foremost, patience is a virtue with these machines. Never be forceful when it comes to loading and unloading paper from the machine. Second, make sure not to just put a Band-Aid on the machine. Pay attention to the replacement timeline for vital parts and fixtures on the copy/printer machine to avoid even bigger problems in the future. Third and final, have the machine cleaned professionally every once and a while.
2) Common Toner Cartridge (problems and solution)
The most common toner cartridge failure is usually due to issues with the drum unit. The drum has a wiper blade which scrapes any excess toner off the surface as well as off the paper and Transfer Belt.
When the OPC Drum Unit and all of it's components are not in perfect condition then the print quality will be compromised. Below are many of the issues with toner and drum units and also what tell tale signs to look for on the printed page. A high quality generic toner cartridge should not show any of the defects discussed below, however often cheap and poorly made toners will display various defects due to poor manufacturing techniques. Once again we stress that if you are going to use non genuine toners make sure that you buy them from a reputable dealer.
Common OPC Drum faults faults
Perfectly straight and very thin vertical line running full length of page
Indicates a scratched drum generally caused from foreign matter or build up of toner on the Wiper Blade, which scratches a ring around the drum during rotation.
Dots that repeat evenly down the page
This indicates a chip in the drum surface referred to commonly as a “pinhole”. The distance between the dots is dependent on the circumference of the drum (generally 4 times). Some pinholes, on closer inspection, can be built up foreign matter which can be removed with a cotton bud and Iso-Propyl alcohol.
Dots that repeat evenly down the page accompanied by a horizontal band across the page
The dots indicate a pinhole and the band across the page. Indicates a short against the PCR, which is due to the pinhole.Smears of toner across the page which are equally separated vertically
Caused by light damaged drum coating (sunlight). The distance between the smears is dependent on the circumference of the drum, generally 4 times. Exposing the Drum to direct light for long periods of time damages the coating/film.Thin lines across the page equally spaced
Calculate the circumference of the drum and if the thin lines are the same distance apart as the Drums circumference then the Wiper Blade has marked the Drums coating. This generally occurs with periods of time where the wiper blade rests against the drum when at rest. Heat also can play a role in this.Grey “tyre tracks” on right or left side of page
This issue is also sometimes described as wind blown sand. It is caused by a worn out drum. It indicates that the drum coating or film is starting to wear thin.Wiper blade faults
The next most common toner cartridge issue to occur would be due to an problem with the Wiper Blade. After the image is transferred from the Drum to the paper or Drum to the transfer Belt there will be residual waste toner on the Drums surface which needs to be cleaned before the next revolution of the Drum. The Wiper Blades job is to collect, clean and scrape any residual waste toner from the Drums surface, depositing it into the waste toner hopper
Common wiper blade faults are
Thin line down the page
This is caused by a cut or nick in the blade which fails to collect, clean and scrape toner from the drums surface effectively leaving a lined mark down the page. This can also be attributed to a worn blade.Gray page with toner visible on drum
The Wiper Blade isn’t applying adequate pressure to the drum to successfully clean the residual toner from the drum, which then gets applied to the next revolution of print. This problem is often due to the Wiper Blade not being correctly fixed in place (not screwed down properly,incorrect sealing foam etc). It can also be caused by an old wiper blade which has stiffened overtime. A stiffened blade doesn’t apply enough pressure to the surface of the drum which in turn limits the collecting, cleaning and scraping capability of residual toner. An indicator of an aged Polyeurethane Wiper Blade is a yellowy tinge.Poorly lubricated blade, seizing drum revolution
The Wiper Blade constantly applies pressure to the Drum, if the blade is poorly lubricated it will stick to the drum and travel in the same direction. Once the Blade has flipped it will apply immense pressure to the drum often seizing it completely or requiring a fair amount of force to turn it. Generally this will be accompanied by a loud clicking noise from the printer, thankfully the printer has a clutch to prevent stripping of gears and further damage occurring. You will see some compatible colour cartridges using Yellow toner as a lubricant, the Yellow toner tends to be finer and smoother and works quite well as a form of powdered lubricant.Magnetic Roller faults
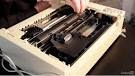
The Magnetic Sleeve is effectively a coated aluminium roller that transfers the toner from the supply chamber to the drum by use of magnetic attraction. To break it down the Magnetic Roller sleeve encases a Magnet in the same shape as the Magnetic Sleeve. There is an electrical contact at the end of the sleeve to which a charge is applied to amplify the magnetic attraction. The black conductive coating found on the Magnetic Sleeve is made of various conductive materials with the sole aim of carrying the toner. Most failures are usually due to scratches or excessive wear of the coating. Toner particles in general are abrasive, when combined with pressure from the doctor blade doctoring/pressing toner against the Magnetic Sleeve roller effectively causes wear to the coating. Some cartridges use a Developer Roller in place of a Magnetic Roller.Most Common Magnetic Roller Failures
Light print
A worn out magnetic roller is probably the main reason for a light printout to occur. There is a black conductive coating that wears off the sleeve over time. If the coating on the Magnetic Roller were to wear thin or completely through, you would be able to visually sight the black conductive coating turn pale (wearing thin) or even revealing the aluminium tubing underneath. This type of failure will show up more on solid black areas and grey scales. Normal text wouldn’t normally reveal this type of issue.White voids in the print
This is caused by scratches or gouges in the coating of the Magnetic Sleeve. Normally one or two scratches wouldn’t pose a problem however the more scratches there are then the more potential voids there will be. This is especially true when the scratches are all in the same general location.Light and dark banding across page
This is caused by a bent or warped magnetic roller. This normally happens when a hub (especially a metal one) is pressed into the sleeve at an angle. Metal hubs should be removed and replaced with a special press and with delicate care.Intermittent printing
A Magnetic Sleeve contact transfers charge from the printer to the conductive black coating on the surface of the Magnetic Sleeve. If the contact is bent out of shape, too much electrical grease applied or installed incorrectly it can print either light or blank pages (most often blank).PCR (Primary Charge Roller)
The PCR is a roller which controls the charge being applied to the Drum Cylinder. Basically it places an initial uniform charge on the drum then towards the end of the cycle erases the residual charge once more applying a uniform charge. This leads into the next print cycle(each revolution of the drum is considered a ‘cycle’). Because of this dual role, there are some severe failures which can come from the PCR. Most of these failures will show up more in winter where the humidity is low rather than in summer when it is high (this is due to Static build up).
Most Common PCR Failures:
Ghosting:
Ghosting is commonly known as repetition of print already applied to the page (duplication). It is more commonly seen replicating dense print however can repeat all density levels depending on the severity of additional charge (the replicated print is produced in lower density almost producing a silhouette replication of the print, hence the descriptive term "Ghosting". A ghosting issue in general is derived from a charge related problem. This can occur when the outer coating of the PCR is faulty (too much cleaning fluid) or too much conductive grease is applied to the PCR Clips/Housing.A cut or hole in the PCR
This results in a repetitive black mark at equal distance to the circumference of the roller. Sometimes these marks can short out across the Drum Cylinder creating excess charge across the drum attracting additional toner when produces a dark ‘band’ horizontally across the page. The markings and ‘bands’ will be repetitive in nature (7+ repetitions down the page).Random dots across the page
These can either be black dots, or white dots in black areas. This is caused by excess lubrication powder sticking to the PCR. These dots will be repetitive in nature depending on the circumference of the PCR (7+ repetitions down the page).Vertical marks on print, generally found on the LHS or RHS of page
If the cartridge is still fresh and markings appear on the print in a blob or smear like fashion, generally this means the PCR has been marked with conductive grease. Commonly it will be located on the LHS or RHS of print near the PCR Clip/Housing (accidental conductive grease application to PCR coating). If continual printing is done, the grease will smear and transfer to the Drum e ectively giving a poor print vertically in the smear zone.The Developer Roller
A Developer Roller is a metal shaft covered in Silicon Rubber with a specially designed surface coating. Both the coating and Silicon Rubber help in storing and releasing electrical charge. The Developer Roller is much like a Magnetic Roller, as they both help in the transferral of toner from the toner supply chamber (hopper) to the Drum Unit. The main di fference between the two is how they deal in attracting and repelling toner. A Magnetic Roller utilises Magnetic Charge, where as a Developer Roller utilises electrical charge to attract and repel. Magnetic based toner will use a magnetic roller, if the toner is charged then a developer roller is used.
Common Developer Roller Problems
Light Printing
A worn or dirty Developer Roller surface coating is often the cause of a light printout. The Coating wears out over a period of time and can be accelerated by other factors, such as environment (heat), inadequate Doctor Blade pressure or incorrect/dirty surface coating material. This type of failure will show up more on solid black areas and grey scales. Normal text wont easily reveal this type of issue unless in very severe cases. Essentially less toner is attracted to the Developer Roller than normal.Dark or Excessive Print
Dark or excessive print on the page can be due to incorrect cleaning products being applied to the Developer Roller. The surface coating is a fragile balance of components/materials to aid in attracting or repelling specific toners. This balance can be disturbed when cleaning products are applied, which strip or leave additives (residue) on the surface coating. The majority of cleaning materials are too harsh and often end up stripping some of the coating. This allows the Developer Roller to overcharge causing excess toner to be attracted which leads to dark or excessive prints.Repetitive coloured marks equidistance down the Print
Repetitions measured at the same circumference as the Developer Roller (smaller circumference) will indicate the Developer Roller has been marked. This can occur from sudden force damaging the surface coating of the Developer Roller.Repetitive coloured horizontal lines equidistance down the Print
Repetitive lines measured at the same circumference as the Developer Roller (smaller circumference) will indicate the Developer Roller has been marked. This generally occurs from gradual force from the Doctor Blade pressing into the Developer Roller eventually pitting the roller out of shape.The Doctor Blade
The Doctor Blade controls or ‘doctors’ the amount of toner being applied to the Magnetic or Developer Roller by applying constant pressure to this roller. A worn Doctor Blade can cut grooves or pit a Mag or Developer Roller across the surface resulting in horizontal lines equidistance down the print. The horizontal marks will be measured by the circumference of the roller, ‘white’ void lines for a Magnetic Roller or coloured lines for a Developer Roller and usually extends the length of the roller. An incorrectly installed Doctor Blade will cause light prints due to excessive pressure limiting the amount of toner to the Roller, toner starvation. A worn Doctor Blade will cause an anomaly referred to as ‘Tyre Tracking’ or ‘Sand Dunning’ it’s referred to this due to the appearance of marks. This type of e ffect is created as the blade isn’t rigid or sti ff and the amount of pressure being applied to the Roller isn’t constant, allowing it to ‘flap’ if you will.Recovery Blades
Recovery Blades are thin plastic Mylar blades which guide residual toner back onto rollers or into hoppers. A damaged recovery blade will cause random dots all over the page which can be described as ‘flicking toner’. The most common damage to a blade is it gets bent out of shape during assembly. The toner will then accumulate on top of the blade and drop o or ‘flick’ onto the print. Accumulation of toner will steadily increase with more than the cartridge is used, to a point where it looks reminiscent of a leaking cartridge.Magnetic Roller Bushings
Magenta Roller Bushings are a thin piece of plastic which ‘cu ffs’ the end of the Mag Roller, these are to provide and keep a specific gap between the Mag Roller and the Drum. The Drum rolls directly on these bushings. Cracked, worn, missing or toner filled bushings will physically damage the drums coating, often tearing this coating.
3) printer (software problem and solution )
Testing software
Windows users
- If possible, make sure your printer can print using the above hardware tests.
- Install the printer software provided with your printer. If no software was provided with your printer, see the printer drivers page for a listing of printer drivers. Drivers are required for your printer to properly work with the operating system.
- Click Start, Settings, Printers. In the printers window, verify that your printer manufacturer and model is listed.
- Print a test page by right-clicking the printer icon and then click the Properties option and click print test page. If the test page does not print, download the latest drivers from your printer manufacturer. For a list of printer drivers, see our printer drivers index.
- If the page prints successfully, get back into the printers window, right-click the printer and ensure that there is a check next to Set as default. Newer versions of Windows also show a check next to the printer icon once it is set as the default printer.
- Once the printer is set as default, click Start, Run, type notepad, and press Enter. In Notepad, type a test message and click File and Print. If the printer also prints successfully from this program, but you are still unable to print from another program, it is likely that program has an issue and not your printer.
Comments
Post a Comment